Creating and manipulating Tulip visualizations with the tulipgui module
Starting the 4.4 release of Tulip, a new module called tulipgui is available allowing to create and manipulate Tulip views (typically Node Link diagrams). The module can be used inside the Python Script editor integrated in the Tulip software GUI but also through the classical Python interpreter.
The main features offered by that module are :
- creation of interactive Tulip visualizations
- the ability to change the data source on opened visualizations
- the possibilty to modify the rendering parameters for node link diagram visualizations
- the ability to save visualization snapshots to image files on disk
Using the module from the main Tulip GUI
When the tulipgui module is used through the Python script editor integrated in the Tulip GUI, it enables to add and manipulate views in the Tulip workspace.
For instance, the following script works on a geographical network. We suppose that we already have an opened Node Link Diagram view (plus one Python Script view) in Tulip for visualizing the whole network. The script will extract the induced sub-graph of the european nodes, create a new Node Link Diagram view for visualizing it and set some rendering parameters:
from tulip import *
from tulipgui import *

def main(graph):

    # extraction and creation of the european sub-graph
    continent =  graph.getStringProperty("continent")
    europeNodes = []
    for n in graph.getNodes():
        if continent[n] == "Europe":
            europeNodes.append(n)
    europeSg = graph.inducedSubGraph(europeNodes)
    europeSg.setName("Europe")

    nlvEurope = tlpgui.createView("Node Link Diagram view", europeSg)

    # set labels scaled to node sizes mode
    renderingParameters = nlvEurope.getRenderingParameters()
    renderingParameters.setLabelScaled(True)
    nlvEurope.setRenderingParameters(renderingParameters)
Using the module with the classical Python interpreter
The tulipgui module can also be used with the classical Python interpreter and shell. Tulip interactive visualizations will be displayed in separate windows once they have been created.
Interactive mode
When working through the Python shell, Tulip views can be created interactively. The opened views will be updated each time the graph or its properties are modified.
For instance, the following session imports a grid graph, creates a Node Link Diagram view of it and then changes the nodes colors. The Node Link Diagram view will be updated automatically.
>>> from tulip import *
>>> from tulipgui import *
>>> grid = tlp.importGraph("Grid")
>>> view = tlp.createNodeLinkDiagramView(grid)
>>> viewColor = graph.getColorProperty("viewColor")
>>> for n in graph.getNodes():
...     viewColor[n] = tlp.Color(0, 255, 0)
...
Warning
When working on Windows platforms, you have to use the Python command line utility (not the IDLE one) if you want to use the tulipgui module interactively. In a same maneer, if you intend to launch python through a terminal, you have to used the basic windows console cmd.exe. Other shells like mintty or rxvt do not allow to process the GUI events, required for interactive use.
Script execution mode
When executing a script from a command line through the classical python interpreter, if Tulip views had been created during its execution, the script will terminate once all view windows had been closed.
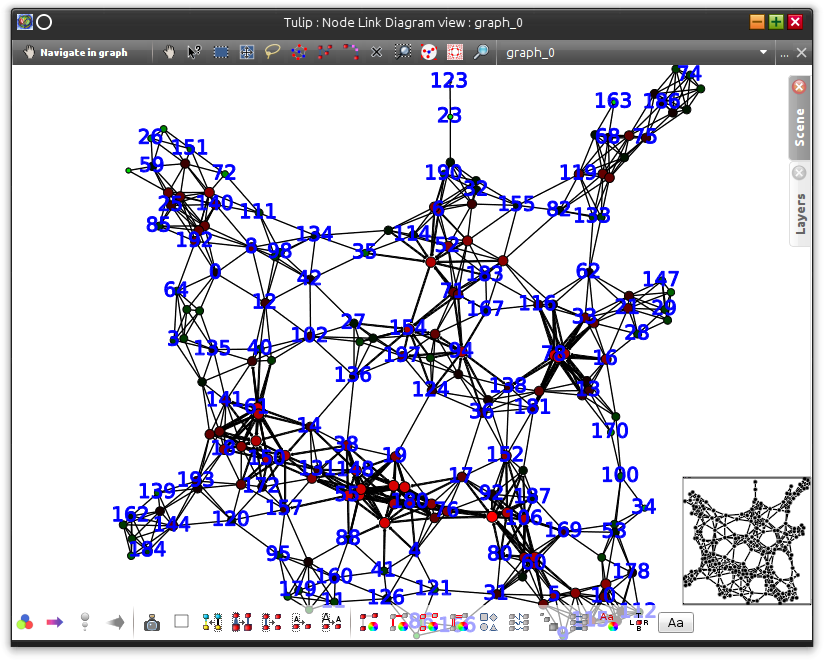
Below are some samples scripts illustrating the features of the tulipgui module. The first script imports a grid approximation graph, computes some visual attributes on it and creates a Node Link Diagram visualization (which will remain displayed at the end of the script execution). Figure 1 introduces a screenshot of the created view.:
from tulip import *
from tulipogl import *
from tulipgui import *

# Import a grid approximation (with default parameters)
graph = tlp.importGraph("Grid Approximation")

# Get references to some view properties
viewLayout = graph.getLayoutProperty("viewLayout")
viewSize = graph.getSizeProperty("viewSize")
viewBorderWidth = graph.getDoubleProperty("viewBorderWidth")
viewLabelBorderWidth = graph.getDoubleProperty("viewLabelBorderWidth")
viewColor = graph.getColorProperty("viewColor")
viewLabelColor = graph.getColorProperty("viewLabelColor")
viewLabelBorderColor = graph.getColorProperty("viewLabelBorderColor")
viewBorderColor = graph.getColorProperty("viewBorderColor")
viewLabel = graph.getStringProperty("viewLabel")
viewShape = graph.getIntegerProperty("viewShape")

# Compute an anonymous degree property
degree = tlp.DoubleProperty(graph)
degreeParams = tlp.getDefaultPluginParameters("Degree")
graph.applyDoubleAlgorithm("Degree", degree, degreeParams)

# Map the node sizes to their degree
sizeMappingParams = tlp.getDefaultPluginParameters("Size Mapping", graph)
sizeMappingParams["property"] = degree
sizeMappingParams["min size"] = 10
sizeMappingParams["max size"] = 30
graph.applySizeAlgorithm("Size Mapping", viewSize, sizeMappingParams)

# Apply an FM^3 layout on it
fm3pParams = tlp.getDefaultPluginParameters("FM^3 (OGDF)", graph)
fm3pParams["Unit edge length"] = 100
graph.applyLayoutAlgorithm("FM^3 (OGDF)", viewLayout, fm3pParams)

# Create a heat map color scale
heatMap = tlp.ColorScale([tlp.Color.Green, tlp.Color.Black, tlp.Color.Red])

# Map the node colors to their degree using the heat map color scale
# Also set the nodes labels to their id
for n in graph.getNodes():
    pos = (degree[n] - degree.getNodeMin()) / (degree.getNodeMax() - degree.getNodeMin())
    viewColor[n] = heatMap.getColorAtPos(pos)
    viewLabel[n] = str(n.id)

# Set border colors values
viewBorderColor.setAllNodeValue(tlp.Color.Black)
viewLabelColor.setAllNodeValue(tlp.Color.Blue)
viewLabelBorderColor.setAllNodeValue(tlp.Color.Blue)

# Add a border to nodes/edges
viewBorderWidth.setAllNodeValue(1)
viewBorderWidth.setAllEdgeValue(1)

# Sets nodes shapes to circle
viewShape.setAllNodeValue(tlp.NodeShape.Circle)

# Create a Node Link Diagram view and set some rendering parameters
nodeLinkView = tlpgui.createNodeLinkDiagramView(graph)
renderingParameters = nodeLinkView.getRenderingParameters()
renderingParameters.setViewArrow(True)
renderingParameters.setMinSizeOfLabel(10)
nodeLinkView.setRenderingParameters(renderingParameters)

Figure 1: Screenshot of the view created by the above script.
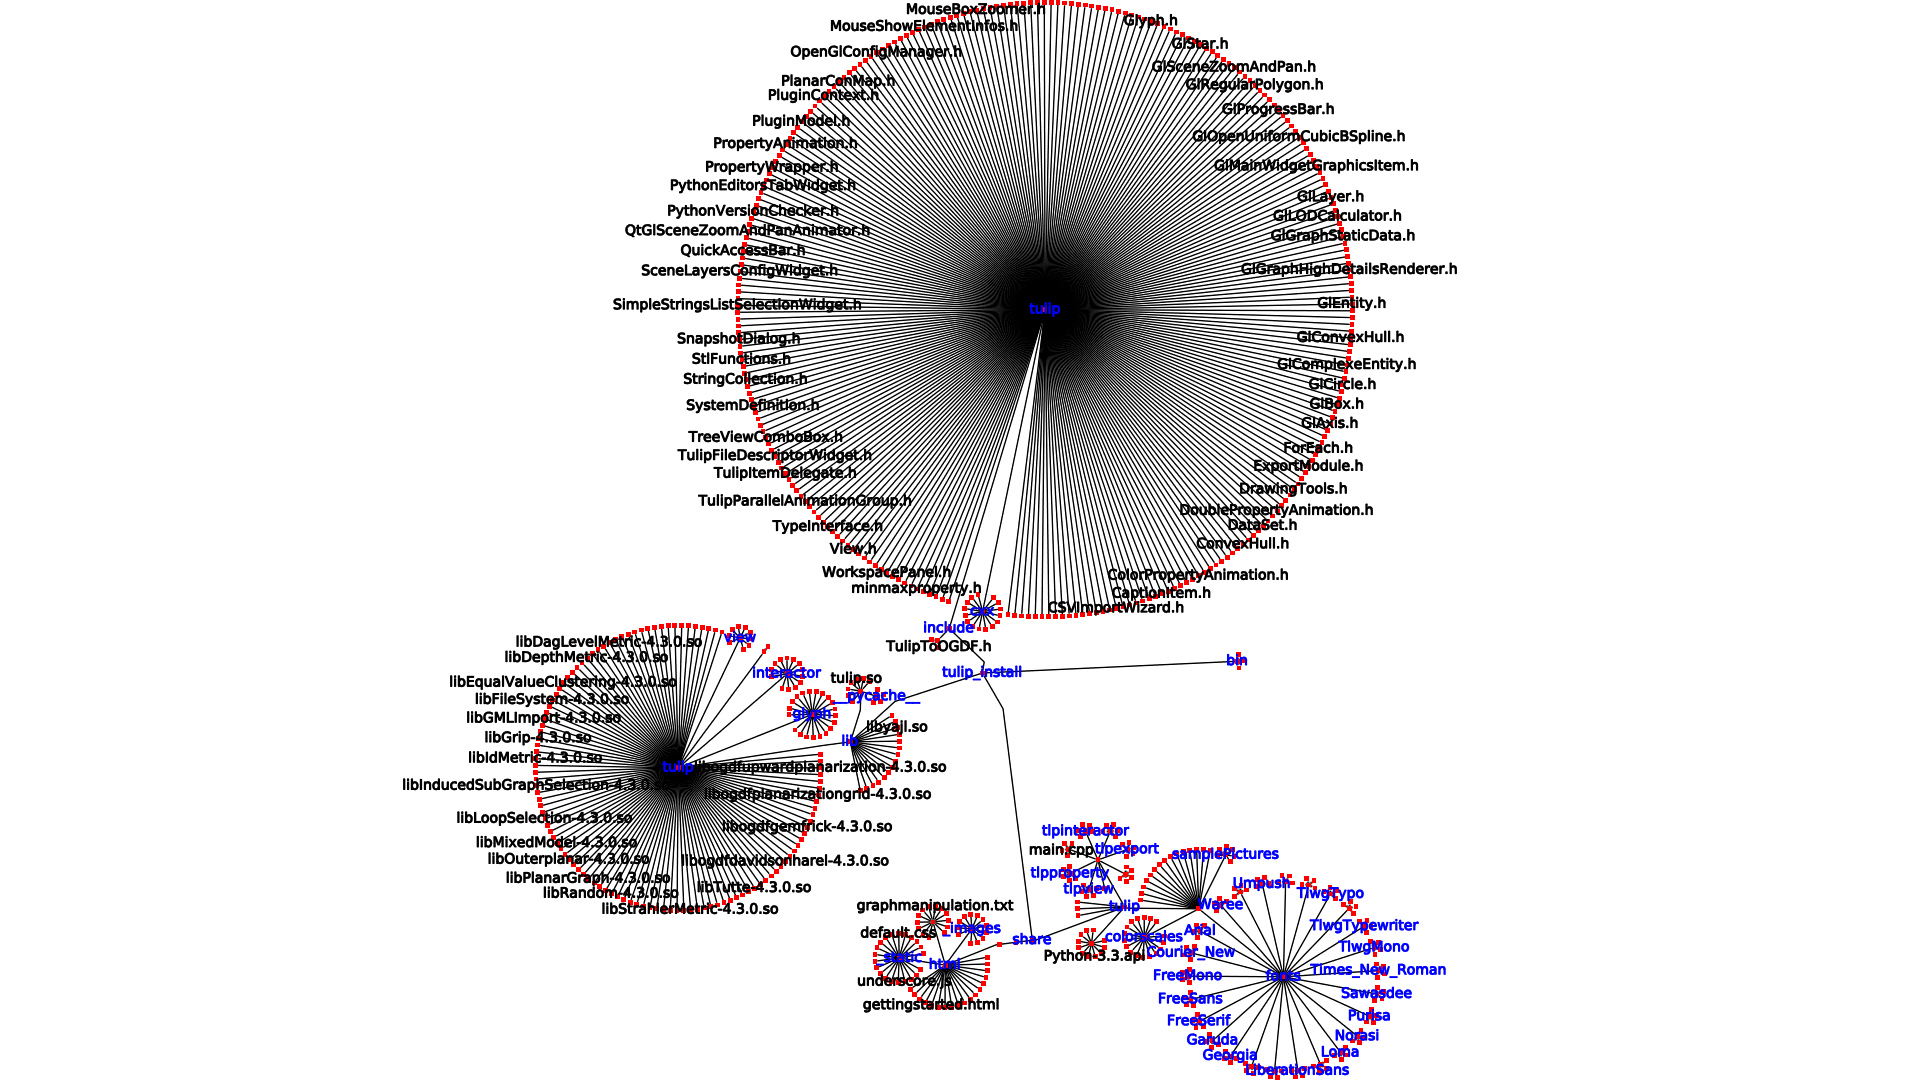
The second script aims to generate a snapshot of a file system directory visualization. It begins by calling the “File System Directory” import plugin, then it sets some visual attributes on graph elements and finally it creates a node link diagram view (that will not be displayed) with particular rendering parameters for taking the snapshot. Figure 2 introduces the resulting snaphot.:
from tulip import *
from tulipogl import *
from tulipgui import *

# Create an empty graph
graph = tlp.newGraph()

# Set the parameters for the "File System Directory" Import module
fsImportParams = tlp.getDefaultPluginParameters("File System Directory", graph)
fsImportParams["dir::directory"] = "/home/antoine/tulip_install"

# Import a file system directory content as a tree
tlp.importGraph("File System Directory", fsImportParams, graph)

# Get some visual attributes properties
viewLabel =  graph.getStringProperty("viewLabel")
viewLabelColor =  graph.getColorProperty("viewLabelColor")
viewLabelBorderColor =  graph.getColorProperty("viewLabelBorderColor")
viewLayout =  graph.getLayoutProperty("viewLayout")
viewBorderWidth = graph.getDoubleProperty("viewBorderWidth")

# Apply the "Bubble Tree" layout on the imported graph
bubbleTreeParams = tlp.getDefaultPluginParameters("Bubble Tree", graph)
graph.applyLayoutAlgorithm("Bubble Tree", viewLayout, bubbleTreeParams)

# Creates a property that will be used to order the rendering of graph elements
# as we want to be sure that the directory nodes labels will be visible
renderingOrderingProp = graph.getDoubleProperty("rendering ordering")

for n in graph.getNodes():
    # the "File System Directory" import plugin adds a "File name" property containg the file name
    viewLabel[n] = graph["File name"][n]
    # if the node represents a directory, ensure that its label will be visible (as we will activate the "no labels overlaps" mode)
    # also change its label color to blue
    if graph.deg(n) > 1:
        renderingOrderingProp[n] = 1
        viewLabelColor[n] = viewLabelBorderColor[n] = tlp.Color(0, 0, 255)
    else:
        renderingOrderingProp[n] = 0

viewBorderWidth.setAllEdgeValue(1)

# Create a Node Link Diagram view without displaying it
nodeLinkView = tlpgui.createView("Node Link Diagram view", graph, tlp.DataSet(), False)

renderingParams = nodeLinkView.getRenderingParameters()

# Activate the ordered rendering mode
renderingParams.setElementOrdered(True)
renderingParams.setElementOrderingProperty(renderingOrderingProp)

# Activate the "no labels overlaps" mode
renderingParams.setLabelsDensity(0)
renderingParams.setMinSizeOfLabel(7)
nodeLinkView.setRenderingParameters(renderingParams)

# Save a snapshot of the view to an image file on disk
nodeLinkView.saveSnapshot("/home/antoine/tulip_install_view.png", 1920, 1080)
Embedding Tulip views into a PyQt4 application
It is also possible to integrate Tulip views into a PyQt4 application. For that feature to work, your local installation of PyQt needs to be linked against the same version of Qt used to build Tulip (usually Qt 4.8). As we can not distribute PyQt4 due to licence incompatibilty, two methods are provided in order to dynamically wrap instances of QWidget used to render the view. You need to have PyQt4 install for that feature to work linked against the same version of Qt used to build Tulip and using the same version of SIP used to build the Tulip Python bindings (meaning, you will surely have to compile Tulip and PyQt4 yourself, otherwise you are lucky).
The method tlpgui.View.viewQFrame() returns an object of type PyQt4.QtGui.QFrame that wraps the QFrame enclosing the whole view.
The method tlpgui.View.viewQGraphicsView() returns an object of type PyQt4.QtGui.QGraphicsView that wraps the QGraphicsView used to display the view elements.
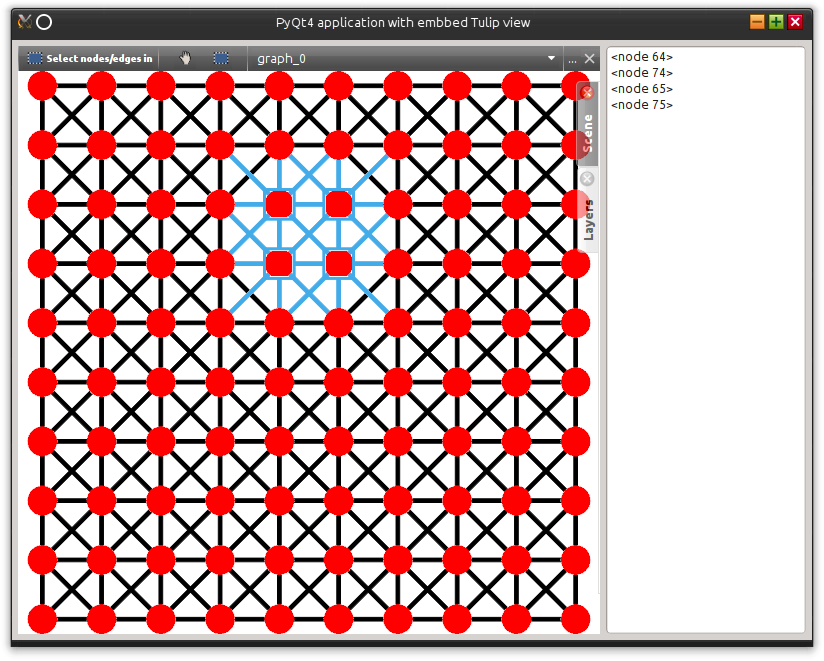
The sample script shows a simple PyQt application containing a Tulip view and a list widget. The list widget is then populated based on the nodes selected in the view. That script also demonstrates the properties observation mechanism in Tulip. Figure 3 shows a screenshot of that application.:
# Sample PyQt4 application with embedded Tulip view
# It populates a list widget with the nodes selected in the view

from tulip import *
from tulipogl import *
from tulipgui import *

import sip
import sys
import PyQt4.QtGui

# Create an observer object that will populate a QListWidget
# based on the nodes selected in a graph
class GraphSelectionObserver(tlp.Observable):
  def __init__(self, listWidget):
    tlp.Observable.__init__(self)
    self.listWidget = listWidget

  def treatEvent(self, event):
    # if the viewSelection property has been modified
    if isinstance(event, tlp.PropertyEvent) and event.getProperty().getName() == "viewSelection":
      viewSelection = event.getProperty()
      # a node has been selected/deselected
      if event.getType() == tlp.PropertyEvent.TLP_AFTER_SET_NODE_VALUE:
        if viewSelection[event.getNode()]:
          self.listWidget.addItem(str(event.getNode()))
      # all nodes have been deselected
      elif event.getType() == tlp.PropertyEvent.TLP_AFTER_SET_ALL_NODE_VALUE:
        self.listWidget.clear()

# Create a QMainWindow that will contain a Tulip Node Link Diagram view
# and a QListWidget
class MainWindow(PyQt4.QtGui.QMainWindow):

  def __init__(self, graph):
    PyQt4.QtGui.QMainWindow.__init__(self)

    # create the Tulip view without displaying it (important otherwise you won't be able
    # to integrate the widget in your application)
    self.nlv = tlpgui.createView("Node Link Diagram view", graph, tlp.DataSet(), False)

    # change the interactors list to a subset of the default one
    interactors = []
    interactors.append(tlpgui.createInteractor("InteractorNavigation"))
    interactors.append(tlpgui.createInteractor("InteractorSelecion"))
    self.nlv.setInteractors(interactors)

    # hide overview and quick access bar
    self.nlv.setOverviewVisible(False)
    self.nlv.setQuickAccessBarVisible(False)

    layout = PyQt4.QtGui.QHBoxLayout()

    # get a wrapper of type PyQt4.QtGui.QFrame of the view frame
    frame = self.nlv.viewQFrame()

    # add it to the main window central widget layout
    layout.addWidget(frame)

    widget = PyQt4.QtGui.QWidget()
    listWidget = PyQt4.QtGui.QListWidget()
    listWidget.setMinimumWidth(200)
    layout.addWidget(listWidget)

    # Create an object that will observe the graph and its properties
    self.observer = GraphSelectionObserver(listWidget)
    graph.addListener(self.observer)
    for p in graph.getProperties():
      graph.getProperty(p).addListener(self.observer)

    widget.setLayout(layout)
    self.setCentralWidget(widget)
    self.graph = graph
    self.setWindowTitle("PyQt4 application with embbed Tulip view")
    self.resize(800, 600)

# No need to create a QApplication as the tulipgui module has already created one

graph = tlp.importGraph("Grid")
mw = MainWindow(graph)
mw.show()

if not sys.flags.interactive:
    sys.exit(PyQt4.QtGui.QApplication.instance().exec_())

Figure 3: Screenshot of a simple PyQt4 application embedding a Tulip view
