The objective of tulip-ogl's class is to be as modular as possible, giving the user a full scalable and Tulip-compatible engine to render custom augmented displays.
GlSimpleEntity is the mother-class of every 2D/3D shape. It provides one important virtual functions : draw, and one important data field : boundingBox. By generalizing this class, you can have classes making calls to OpenGL functions within the draw function. The other classes of the library are : GlLine, GlPolygon, GlBox, GlCircle, GlGrid, GlMultiPolygon, GlQuad, GlRect, GlRectTextured, GlSphere.
There are 4 basic Gl classes which display in 2D or 3D. Each of them represents a different primitive.
GlLine : Describes a line according to a start position, a start color, an end position and an end color.
GlQuad : Describes a quad according to a position and a size, or according to four points.
GlRect : Describes a rectangle according to a position and a size, or according to two points.
GlPolygon : Describes a polygon according to a vector of positions.
GlBox : Displays a box. This augmented display is built with 6 GlQuad.
GlGrid : Displays a 3D or a 2D projection of a grid. This augmented display is built with GlLine.
GlCircle : Describes a circle according to a position and a size.
GlMultiPolygon : Describes a set of polygon.
GlComplexPolygon : Describe a convex or concav polygon with color texture and hole
GlRectTextured : Describes a textured rectangle according to a position and a size, or according to two points.
GlSphere : Describes a sphere according to a position and a size.
The core of a view is the scene. A scene contain all opengl information and hierarchy of GlEntity to display graph and augmented displays
In the scene you have one or N layers
A layer contain a camera and a hierarchy of GlEntity
In NodeLinkDiagramComponent you have three layers : background (2D layer), Main (graph layer) and Foreground (2D layer).
In following example you construct GlEntity and add it in the Main layer. To get this main layer you just need to call scene->getLayer("Main")
This section contains three small examples of use of the augmented displays with tulip. We admit the user has a GlLayer already defined in the variable glMainLayer.
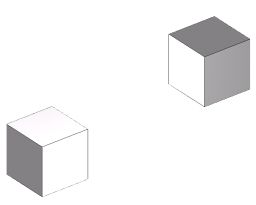
In the given screenshots, the scene is composed of two nodes placed at positions (-1, -1, -1) and (1, 1, 1). Their sizes are (1, 1, 1)
Here is the base screenshot of the scene :
You can download plugins skeletons here .
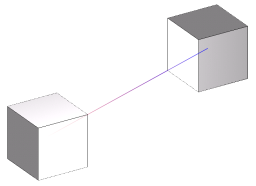
This simple example shows how to add a Line from the position (-1, -1, -1) to the position (1, 1, 1) as an augmented display in a GlScene, the line will be starting Blue and will finish transparent Red; the thickness of the line will be set to 1 pixel.
Coord startPos(-1, -1, -1);
Coord endPos(1, 1, 1);
Color startCol(0, 0, 255, 255);
Color endCol(255, 0, 0, 0);

// We create the line, the last parameter is the thickness of the line
 (note : you can't exceed 10)
GlLine* line = new GlLine(startPos, endPos, startCol, endCol, 1);

// Finally we add the line to the GlLayer, naming it "The famous
 tutorial line"
glMainLayer->addGlEntity(line, "The famous tutorial Line");
Here is the screenshow of the result :
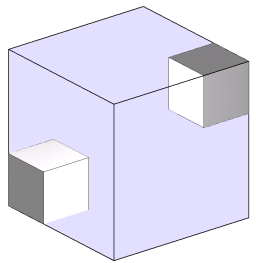
This example shows how to add a Box from the position (-1.5, -1.5, -1.5) to the position (1.5, 1.5, 1.5) as an augmented display in a GlLayer. The box will be blue and semi transparent (220, 220, 255, 80).
Coord topLeft(-1.5, -1.5, -1.5);
Coord bottomRight(1.5, 1.5, 1.5);
Color boxColor(220, 220, 255, 80);

// We create the box by giving the bounding box to the constructor
// (topLeft and bottomRight) and the color of the box.
GlBox *box = new GlBox(topLeft, bottomRight, boxColor);

// Finally we add the box to the GlLayer, naming it
"Gl Tutorial 2 : Box"
glMainLayer->addGlEntity(box, "Gl Tutorial 2 : Box");
Here is the screenshot of the result :
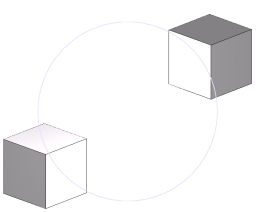
This example shows how to add a Circle centered at the middle of the screen, of a radius of 256 pixels(The screenshot has been scaled). The circle will be light blue and will have 50 segments
//We firstly add a new GlLayer (with name "2D layer") in the scene and set layer to 2D mode
GlLayer *layer2D=new GlLayer("2D layer");
layer2D->set2DMode();
glScene->addLayer(layer2D);

//after, get the viewport to guess the center of the window
Vector<int, 4> viewport;
viewport = glScene->getViewport();

// This is the position of the center of the circle
// (ScreenWidth / 2, ScreenHeight / 2, 1)
Coord circleCenter(viewport[2] / 2, viewport[3] / 2, 0);
Color circleColor(220, 220, 255, 255);

// We create the circle giving it's center position, it's color,
 it's radius and the number of segments
GlCircle* circle = new GlCircle(circleCenter, circleColor,
 256, 50);

// Finally we add the circle to the GlLayer.
layer2D->addGlEntity(circle, "Gl Tutorial 3 : Circle");
Here is the screenshot of the result (the screenshot has been shrinked so the radius is not of 256 pixels) :
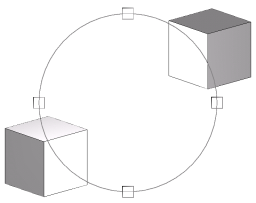
This example shows how to use GlComposite to compose multiple effects in a scene. The scene will be composed of a sphere and 4 rectangles, to simulate an ArcBall
The circle will be positionned at the center of the screen. It will have a radius of 256 pixels and will be of a medium grey (128, 128, 128, 255).
The four squares will be positionned every 90° on the circle. They will also be in medium gray, and only wired
//We firstly add a new GlLayer (with name "2D layer") in the scene and set layer to 2D mode
GlLayer *layer2D=new GlLayer("2D layer");
layer2D->set2DMode();
glScene->addLayer(layer2D);

// Create a new composite to store the final Augmented display :
GlComposite *composite = new GlComposite();

// This is the medium grey color that will be applied to every Gl shape :
Color color(128, 128, 128, 255);
// We get the viewport for the circle :
Vector<int, 4> viewport;
viewport = glScene->getViewport();

// This is the position of the center of the circle
// (ScreenWidth / 2, ScreenHeight / 2, 1)
Coord circleCenter(viewport[2] / 2, viewport[3] / 2, 0);

// We create the circle. It still have 50 segments
GlCircle* circle = new GlCircle(circleCenter, color, 256, 50);

// A 4 entries table for the squares
GlRect* rects[4];

Coord center, topLeft, bottomRight;

for(int i=0; i < 4; i++)
  {
    // We calculate the position of the center of each square
    center[0] = cos((double)i * 3.14/2.0) * 256;
    center[1] = sin((double)i * 3.14/2.0) * 256;
    center[2] = 0;
    center = center + circleCenter;

    // Then we find the position of the topLeft and the bottomRight corner
    topLeft     = center - Coord(16, 16, 0);
    bottomRight = center + Coord(16, 16, 0);

    rects[i] = new GlRect(bottomRight, topLeft, color, color);
  }

// We add the circle and the 4 squares to the composite
composite->addGlEntity(rects[0], "Gl Tutorial 4 : Rect1");
composite->addGlEntity(rects[1], "Gl Tutorial 4 : Rect2");
composite->addGlEntity(rects[2], "Gl Tutorial 4 : Rect3");
composite->addGlEntity(rects[3], "Gl Tutorial 4 : Rect4");
composite->addGlEntity(circle, "Gl Tutorial 4 : Circle");

// Finally we add the composite to the GlLayer
layer2D->addGlEntity(composite, "Composite");
Here is a screenshot of the result :
This is very simple but you can do more simply : a GlLayer is composed with a GlComposite, so you can add rectangles and circle directly to the layer2D, like this :
// We add the circle and the 4 squares to the GlLayer
layer2D->addGlEntity(rects[0], "Gl Tutorial 4 : Rect1");
layer2D->addGlEntity(rects[1], "Gl Tutorial 4 : Rect2");
layer2D->addGlEntity(rects[2], "Gl Tutorial 4 : Rect3");
layer2D->addGlEntity(rects[3], "Gl Tutorial 4 : Rect4");
layer2D->addGlEntity(circle, "Gl Tutorial 4 : Circle");